
How AI Becomes a Doctor’s Superpower: The Magic of CNNs and U-Nets in Medical Imaging
- Kamya kanara
- Apr 28, 2025
- 8 min read

Updated: Apr 29, 2025
Introduction
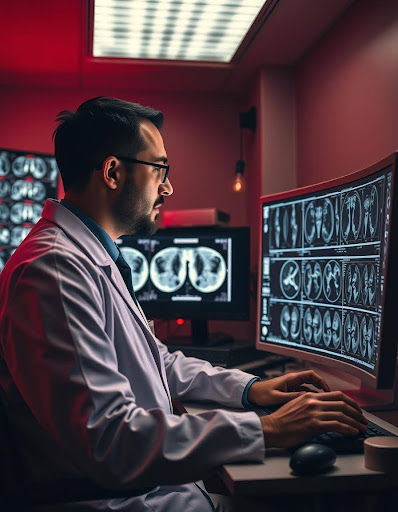
Medical imaging—such as X-rays, MRIs and CT scans—plays a crucial role in diagnosing diseases like cancer, pneumonia and brain tumors. However, analyzing these images manually is time-consuming and prone to human error.
This is where Artificial Intelligence (AI) and Deep Learning step in.
AI in Medical Imaging (A Game Changer): While radiologists spend ~15 minutes per scan, AI analyzes 1,000+ images in that time (Nature Medicine, 2023). These models don’t replace doctors—they act as 24/7 assistants to:
Faster diagnoses: AI scans 1,000 images in the time a radiologist reads 10.
Sharper accuracy: Detects tumors missed by the human eye (micro-tumors <1mm)
24/7 assistance: Acts as a "second opinion" for overworked clinicians.
In this blog, we’ll explore three powerful deep learning architectures used in medical imaging:
Convolutional Neural Networks (CNNs) – For image classification (e.g., detecting pneumonia in X-rays).
UNet – For image segmentation (e.g., outlining tumors in MRI scans).
ResNet (Residual Networks) – For deep learning without forgetting (e.g., identifying rare diseases in large datasets).
Let’s dive deep into how these models work, their real-world applications, and why they’re transforming healthcare.
CNN (Convolutional Neural Network) – The Super-Smart Picture Detective
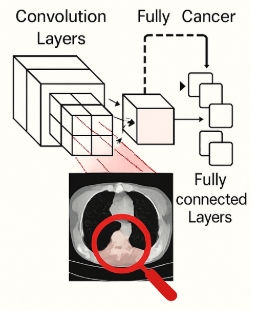
What it does
Imagine CNN is like your favorite cartoon detective - maybe Inspector Gadget or Paw Patrol's Chase! It looks at pictures (like X-rays or scans) the way you look at a "Where's Waldo?" book, searching for anything that looks unusual or sick.
Figure2: CNN Architecture
How it works
The Super Magnifying Glass (Convolution Layers)
Uses special "magic glasses" (called filters) that each see different things
One pair sees edges (like where bones end)
Another sees blobs (like tumors or infections)
A third sees textures (like fuzzy pneumonia clouds)
It slides these glasses over every inch of the picture like a detective scanning a crime scene.
ReLU activation: ReLU acts like a strict secretary—ignoring negative clues (values < 0) and passing only positive findings.
To learn more visit (How convolution works in a CNN?)
The Shape Remer (Pooling)
After finding lots of clues, it throws away the boring ones
Keeps only the most important findings - like saving only the biggest red circles from your coloring book
Makes the picture smaller but keeps all the suspicious parts
Reduces computation time by 75% without losing diagnostic value.
The Decision Maker (Fully Connected)
Now it puts all the clues together like solving a mystery
"I saw fuzzy patches here, dark spots there... that means... PNEUMONIA!"
Rings a little alarm bell to tell the doctors
The Mystery Solver (Fully Connected Layers)
Now it's like a smart grandma putting together a jigsaw puzzle
"Hmm... dark spot here + fuzzy area there + white line here = BROKEN BONE!"
Gives each possibility a score: "90% chance it's pneumonia, 5% chance it's normal"
To Build your own CNN visit (Build Your First CNN with PyTorch: A Beginner's Guide)
Use Case

CNNs are already being used to support radiologists and clinicians by automating medical image interpretation:
X-ray Images: Classifying chest X-rays for diseases like pneumonia or tuberculosis.
Retinal Scans: Detecting diabetic retinopathy in eye scans to detect early signs of damage in diabetic patients.
Skin Cancer: Identifying signs of melanoma from dermoscopic images.
UNet – The Surgeon of Segmentation
Imagine you're a superhero doctor trying to find a tiny, sneaky bad guy (a tumor!) hiding deep inside a giant city (an MRI scan).You can’t just say, "Oh, it’s somewhere over there."Nope — you need to draw the exact map, down to the last little street (or pixel!), to plan the rescue.
That’s exactly what our hero UNet does!

What is UNet?
UNet is a special deep learning machine built for one mission: Finding exactly where things are in an image, pixel by pixel.
Think of UNet like a world-class surgeon — not only finding the tumor, but tracing it with a laser pointer so the operation can be perfect.
UNet: The Pixel-Perfect Surgeon
Unlike CNNs that classify whole images, UNet provides precise tumor boundaries—critical for surgery planning. Its secret weapon: skip connections (like a surgeon checking reference photos mid-operation).
Encoder (Contracting Path) | Bottleneck | Decoder (Expanding Path) |
Extracts features using convolution, ReLU, and max pooling. Image shrinks while channels increase. | Deepest layer holding compact, rich feature representation bridging encoder and decoder. | Up samples feature maps, merges details from encoder via skip connections, reconstructs segmentation. |

How it works
The Encoder (Contracting Path)

Goal: Capture all important features.
Think of this side like your robot using a magnifying glass to zoom in and spot tiny important things (features).
Each block on this side does three important tricks:
Convolution Layers ➔ Like the robot sharpening its vision to find edges, shapes, and textures.
ReLU Activation ➔ Tells the robot to only focus on interesting clues (ignore boring, negative stuff).
Max Pooling ➔ Folds the big treasure map smaller and smaller, so the robot keeps only the best clues while throwing away the noise.
As the robot goes deeper, the image becomes smaller, but the features
become richer and smarter!
We are compressing the "what" (important features) and ignoring the "where" (exact position for now).
Bottleneck (Middle Part)
Goal: Store the most powerful secrets about the treasure!
The deepest part of the "U."
Here, the model has the most compressed version of the image — rich with features but tiny in size. (It's a tiny but powerful version of the original image.)
It acts as the bridge between compression (encoder) and expansion (decoder).
This is where the robot says:"Aha! I know exactly what I'm looking for now!"
Decoder (Right Side – Expanding Path)
Goal: Blow up the secret map back to big size — without losing clues!
Now, your robot starts unfolding the treasure map piece by piece, but it has a secret trick: It can peek at the earlier maps it folded! (This is called Skip Connections.)
Each decoder block does:
Upsampling (Transpose Convolution) ➔ Like inflating the small map back into a bigger one.
Concatenation (Skip Connections) ➔ Robot "cheats" by peeking at its older folded maps to not miss any tiny clues!
Convolution + ReLU again ➔ Sharpen the vision even more while expanding.
Without skip connections, the robot would forget tiny important details — like a teeny tiny tumor edge!
Final Output Layer
After the last unfolding, we use a 1x1 convolution — like the robot putting a sticker on every pixel :
1 = Tumor
0 = Healthy background
Sigmoid Activation ➔ Ensures the robot’s labels are nice numbers between 0 and 1 (perfect for coloring the map black and white!).
Output is a segmentation map — every pixel is labeled!
Imagine you're building a robot detective to find hidden treasure (like tumors in MRI scans).
Here's how the code works:
1. The Detective's Tools (Magnifying Glass (UNet Block))
def unet_block(input_tensor, num_filters): # Two magnifying glasses to spot clues (edges/textures) x = layers.Conv2D(num_filters, 3, padding='same', activation='relu')(input_tensor) x = layers.Conv2D(num_filters, 3, padding='same', activation='relu')(x) return x
What it does:
Gives the robot two magnifying glasses (Conv2D) to spot clues (edges/textures).
Relu makes it ignore boring stuff (negative numbers).
2. Shrinking the Treasure Map (Encoder)
# 1st Look (64x zoom)
x1 = unet_block(inputs, 64)
p1 = layers.MaxPooling2D(2)(x1)  # Smush map to half-size (but keep clues)

# 2nd Look (128x zoom)
x2 = unet_block(p1, 128)
p2 = layers.MaxPooling2D(2)(x2)  # Fold again
What it does:
Like folding a big treasure map into smaller sections.
MaxPooling keeps the most important clues while reducing size.
3. The Tiny Secret Map (Bottleneck)
bottleneck = unet_block(p2, 256) # Super zoomed-in view!The robot folds the map super small—but now it really knows where the treasure is!
4. Unfolding + Cheating (Decoder with Skip Connections)
# 1st Unfold (128x zoom)
u1 = layers.Conv2DTranspose(128, 2, strides=2, padding='same')(bottleneck)
c1 = layers.concatenate([u1, x2])  # Peek at old maps (skip connections)
x3 = unet_block(c1, 128)

# 2nd Unfold (64x zoom)
u2 = layers.Conv2DTranspose(64, 2, strides=2, padding='same')(x3)
c2 = layers.concatenate([u2, x1])  # Peek again!
x4 = unet_block(c2, 64)
Blowing up the tiny map back to big.
Skip connections let the robot "cheat" by checking earlier maps so it doesn’t lose the treasure!
5.The Treasure! (Output)
outputs = layers.Conv2D(1, 1, activation='sigmoid')(x4) # 1 = Mark tumorWhat it makes:
A new map where only the tumor glows white (like a coloring book).
Sigmoid activation ensures output is between 0 (black = healthy) and 1 (white = tumor).
To see the above code implementation visit collab link-UNET.ipynb - Colab
Output Example (Pretend MRI Scan)
Input MRI: | [128x128 grayscale image] |
Output Prediction: | [128x128 map where WHITE = tumor, BLACK = healthy] |
(Like a coloring book where the robot colors ONLY the tumor!)
Can You Run This in Google Colab?
Yes! Here’s how:
Open Google Colab.
Paste the full code
Why This is Cool
Doctors get robot helpers to find tumors faster!
The robot never gets tired of looking at scans.
Hands-On Project You Can Try!
Want to actually build your own tumor-finding robot? Try this real hands-on project: UNet-based Tumor Segmentation on LGG MRI Dataset:
(No setup needed – runs right in your collab!)
You'll:
Load real MRI images
Train a UNet model
Watch it segment tumors automatically!
Use Cases
Tumor Detection: Locating the boundaries of tumors in brain MRIs.
CT Scan Segmentation: Identifying and segmenting lung tissues in CT scans.
COVID-19 Detection: Highlighting infected regions in chest CT scans.

Figure 7: Tumor Detection
CNN & UNET Architecture Diagram - CNN&UNET_Diagram.ipynb - Colab
Looking Ahead: The Future of AI in Healthcare
The field of medical image analysis is poised for even more advancements. As AI technologies continue to evolve, we can expect more accurate models that can identify diseases even earlier, improve treatment outcomes and reduce healthcare costs. With the continuous development of models like CNNs, UNet and ResNet, the future looks bright for AI-powered healthcare.
Your Thoughts on AI in Healthcare?
What do you think about AI in healthcare? Have you come across any interesting use cases or technologies in the field? Share your thoughts and experiences in the comments below, or let us know what other AI technologies you’d like to learn about!

Closing Thoughts
As AI continues to enhance healthcare, these neural network architectures will play an essential role in transforming the medical landscape. To dive deeper into these technologies, explore our other resources on AI in healthcare, or get hands-on with tutorials(Deep learning for Beginners) and projects to see these models in action.tion.


Very nice project i understood the project and the concept of unet clearly
Well written and good information
Very well written. Keep up the good work👏
Great blog,liked the content
Amazing content ✨